Meeto your Neato!
Purpose of this How-to
This document will help you to get you up and running with your Neato robot. After following these instructions you will be able to connect to your robot (or a simulated robot), examine its sensor data, and drive it around.
Note for Spring 2023 QEA Students: This semester marks the triumphant return of the physical Neato!
Overview
In this module we will be programming the Neato BotVac. The Neato is a powerful, low cost robot platform that we have customized for QEA (it’s also technically a vacuum cleaner, but we’ll be ignoring that for this module!). We have engineered the platform to abstract away a lot of the frustrating bits, allowing you to focus on learning the really fun robotics, physics, math, and computing content.
The robots have each been outfitted with a Raspberry Pi. The Raspberry Pi is a low cost, Linux computer that will serve as a bridge between your laptop and the robot. To use the robot you will initiate a connection from your laptop, via the Olin network, to the Raspberry Pi. Once the connection has been made, the Raspberry Pi will start talking to the robot. All sensor data will then be streamed from the Raspberry Pi to your laptop over Olin’s wireless network. Your laptop will process this sensor data and then send motor commands to the robot over the same network. In this way, all important computation will be done on your laptop. This architecture simplifies the sharing of robots and makes debugging and editing code as easy as possible.
Since you are not modifying the code running on the Raspberry Pi, each robot will function identically (i.e. there is no software you need to modify on the robot). However, due to variance in manufacturing and handling over the years, each robot may have its own hardware idiosyncrocies.
Connecting to the Physical Neatos
Step 0: Make sure you have Matlab installed.
We used Matlab last semester, but just in case…
Step 1: Grab a USB battery pack for the raspberry Pi
Checklist before performing this step:
- The battery indicator light should be at least level 2 (preferably full)
Step 2: Choose your Neato
Checklist before performing this step:
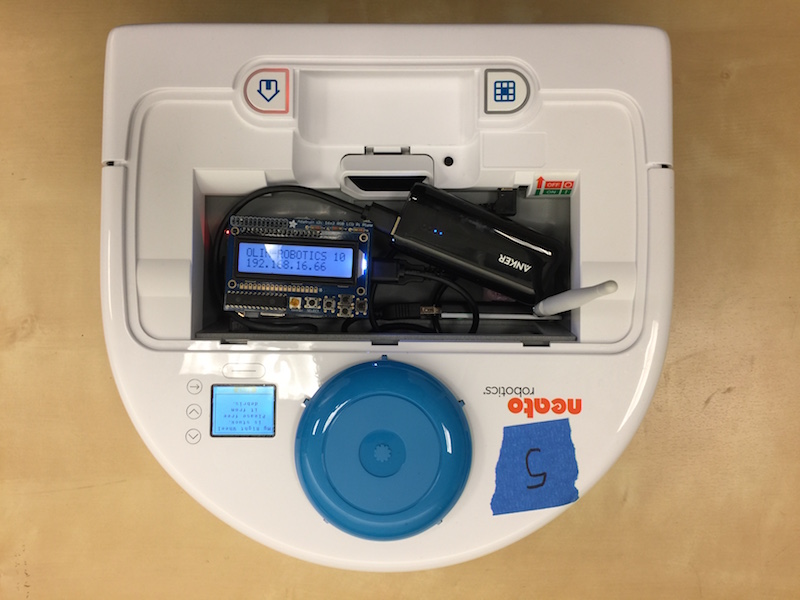
- Make sure the Neato’s batteries are charged. To test this, pull the Neato away from its charging station and for the newer Neato’s hit the button near the front bumper of the Neato that has the home icon on it. For the older Neato’s hit the larger orange power button. The display should illuminate revealing a battery capacity indicator. Sometimes you will have to click the button below the display to dismiss any errors that show up on the Neato’s screen before the battery level is displayed.
Step 3: Connect the USB battery pack to the Raspberry Pi’s USB cable.
It should take about 1 minute for the robot to be ready to use (see step 4 for a final checklist).
Step 4: Connecting to the Neato from Your Laptop
Checklist before performing this step:
- Raspberry pi display backlight is illuminated and not flashing on and off (see troubleshooting section for what to do if this is not the case)
- Raspberry pi display shows that the Neato is connected to the OLIN-ROBOTICS network and has an IP address assigned to it.
- Raspberry pi display shows that the signal strength of the Neato’s connection is at least 70 (the max is 99) for the wifi dongles with antennas, and at least 50 (max is 65) for the dongles without antennas. Note: If the signal strength is too low see troubleshooting section for more information.
- Your laptop is either connected to the ethernet or the OLIN wifi network (Note: this will not work if you are on OLIN-GUEST).
Start up MATLAB on your computer and run the following command.
Note: replace the part of the command below that says 192.168.16.68 with the IP address of your robot that is shown on the Raspberry Pi’s LCD display.
>> [sensors velocities] = neato(192.168.16.68)
You can verify this worked because the robot will start making a quiet whirring sound and the laser (visible from the side) will start rotating. You should also see a window open with a display of the lidar sensor data. You should be able to control the robot with the j, k, l, and i keys. ‘i’ is forward, ‘k’ is stop, and ‘j’ and ‘l’ are turn left and right respectively.
Note that “sensors” and “velocities” are variable names representing your sensor and velocity vectors - you could also call them something different e.g. [sens_robo vel_robo].
When you are ready to disconnect from the robot, you can simply close the window with the lidar sensor display.
Step 5: Shutting Down the Raspberry Pi
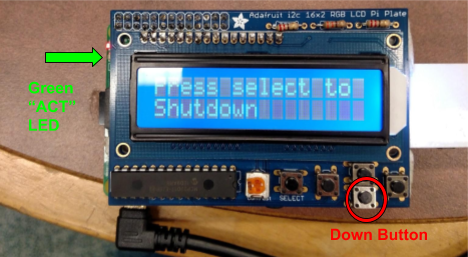
When you are done working with the robot it is important to properly shutdown the raspberry pi. DO NOT just unplug the battery. To shutdown the pi, push the “down” button until you see the message “Press select to Shutdown”. Press select and wait for the green “ACT” LED on the left side of the Pi to flash steadily ten times then stay off. It is then safe to unplug the battery.
Step 6: Connect through MATLAB
The instructions for working with the physical Neato should be identical to the simulated Neato. Please see the sections on Connecting to the Simulated Robot and Programming Your Robot for details.
Troubleshooting Your Neato
Symptom: Both the red and green LEDs on the raspberry pi are illuminated and not flashing.
Potential Cause: the Pi was unable to boot from its SD card.
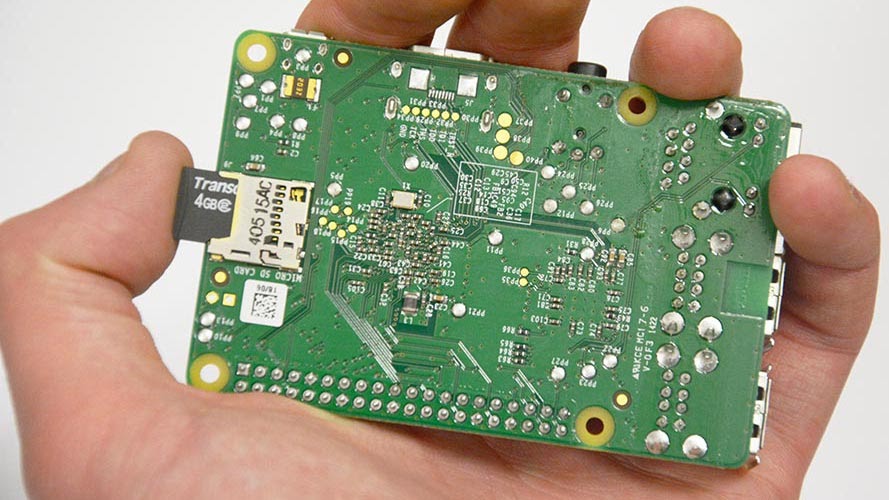
- Solution 1: the first thing to check is that the Raspberry Pi's SD card is fully inserted into the Raspberry Pi. See the image below for the location of the SD card. You will know it is fully inserted if you push on the card and it clicks into place.
- Solution 2: if the card is fully inserted, the SD card may have become corrupted (possibly because some people didn't properly shutdown the Raspberry Pi!). Please send me (Paul.Ruvolo@olin.edu) an e-mail and tell me which robot is having the problem. I'll fix it ASAP, but in the meantime just use another robot.
Symptom: the raspberry Pi display’s backlight is flashing on and off.
Potential Cause: the Pi cannot connect to the robot via the USB cable.
- Solution: sometimes the Neato will turn off due to inactivity. Press button near the front of the Neato’s bumper labeled with the home icon to wake your Neato up. If that doesn’t work, shutdown and then reboot the Pi. If none of this works, the robot battery might be dead. Try recharging the robot. While the robot is recharging, switch to another robot.
Symptom: the Wifi signal strength indicator on the Raspberry Pi is below 60 even though you are right near an access point.
Problem: The Pi has connected to an access point that is not the closest one (this will sometimes happen).
- Solution: Assuming the Pi display is at the screen showing the IP address, press right to enter the network setup menu. OLIN-ROBOTICS should be highlighted with an asterisk. Press right again to reconnect the Pi to the Wifi. If it doesn’t work the first time, try one more time. If it doesn’t work then, switch to a new robot.
Prior to 2023: Running the Robot Through ROS
Note: In past years we have programmed the robots using ROS. ROS is a powerful, open-source framework for robotics that has been widely adopted in both industry and academia. ROS runs natively on Linux, however, and thus we used Docker to support Windows and Mac OSX. This year we will be programming the robots solely through Matlab.
ROS supports several programming languages out of the box, including C++, Python, and Java. Additionally, MATLAB’s Robotics System Toolbox includes support for ROS as well. In this document and in this module, we will walk you through setting up your environment to connect to the robots using Windows, and we will show you how to program the robots using MATLAB. Some folks, especially those in SoftDes, may want to use Ubuntu instead. This is totally fine, and we have instructions on how to setup your environment for Ubuntu. If you’d like, we also have instructions for using the robots in Mac OSX.
Docker Setup
Note: when installing Docker, you will have the option to use Docker with Windows Subsystem for Linux 2 (WSL2). Either option works well with the latest versions of Docker (3.0+). There are some small advantages to use the WSL2 backend, which include easy access to your MATLAB Drive folder and avoiding the need to manage the computational resources allocated to Docker.
Highly Recommended Pre-Install Instructions
For lots of folks, you will be able to skip this step, but we have noticed that some of the student Dell laptops will not be able to complete the Docker install process without doing these steps. In any case, these steps do not hurt to do even if you could have gone through the installation without performing them. As a result, we encourage you to do them. If you are interested in why we have to do this, you can check out the Docker help article Manually Enable Docker for Windows Prerequisites.
In this step you’ll be manually enable the Hyper-V and Container Features, which are both necessary for Docker. First, run PowerShell by typing “powershell” into the windows search bar, right clicking on Windows PowerShell (not the ISE version), and then selecting “Run as Administrator” in the menu that appears.

If you are unfamiliar with how to run PowerShell, here are some links to help you.
In the PowerShell window that pops up, type the following two commands (tip: when asked if you want to restart your computer after entering the first command, answer “no”, and then answer “yes” to the same question after entering the second command. This will save you one reboot).
Enable-WindowsOptionalFeature -Online -FeatureName containers -All
Enable-WindowsOptionalFeature -Online -FeatureName Microsoft-Hyper-V -All
You will likely need to restart your computer after completing these steps. Once you’ve completed the restart process, you can run the Docker installer.
Running the Docker Installer
The only operating systems officially supported by ROS are Ubuntu and Debian (although recently Windows support has been introduced, but it is not straightforward to use). By using a virtual machine we can run an Ubuntu machine from within your Windows setup, which will allow us to run ROS. The tool we will be using to accomplish this is called Docker. Docker will allow us to get the QEA robot software installed on your machine in a relatively painless manner (avoiding the need to install and configure a bunch of software packages yourself).
To install Docker, download and run the installer from DockerHub by clicking the “Get Docker” link. When you see two checkboxes, you can decide whether you want to install the WSL2 components or not (again, both should work fine).
Once the install is complete you may be asked to restart your computer.
Making Sure Docker is Setup Properly
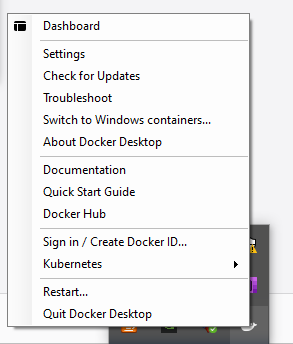
Once the Docker installation has completed (and you have possibly restarted your computer), you should bring up the Docker Desktop dashboard by right clicking on its icon in your system tray and clicking on Dashboard. Here is a picture of the Docker icon (a smiling whale) and where it is located on your system.
If everything is working properly, you will a green light in the lower left corner with the sub text “running” (see picture below for what this should look like). If you don’t see this yet, or the dashboard doesn’t pop up right away, you might just have to be patient. It takes a bit of time for Docker to get started after a reboot. Sometimes Docker will say that it will take a few seconds to be up and running, but in our experience it often takes longer.
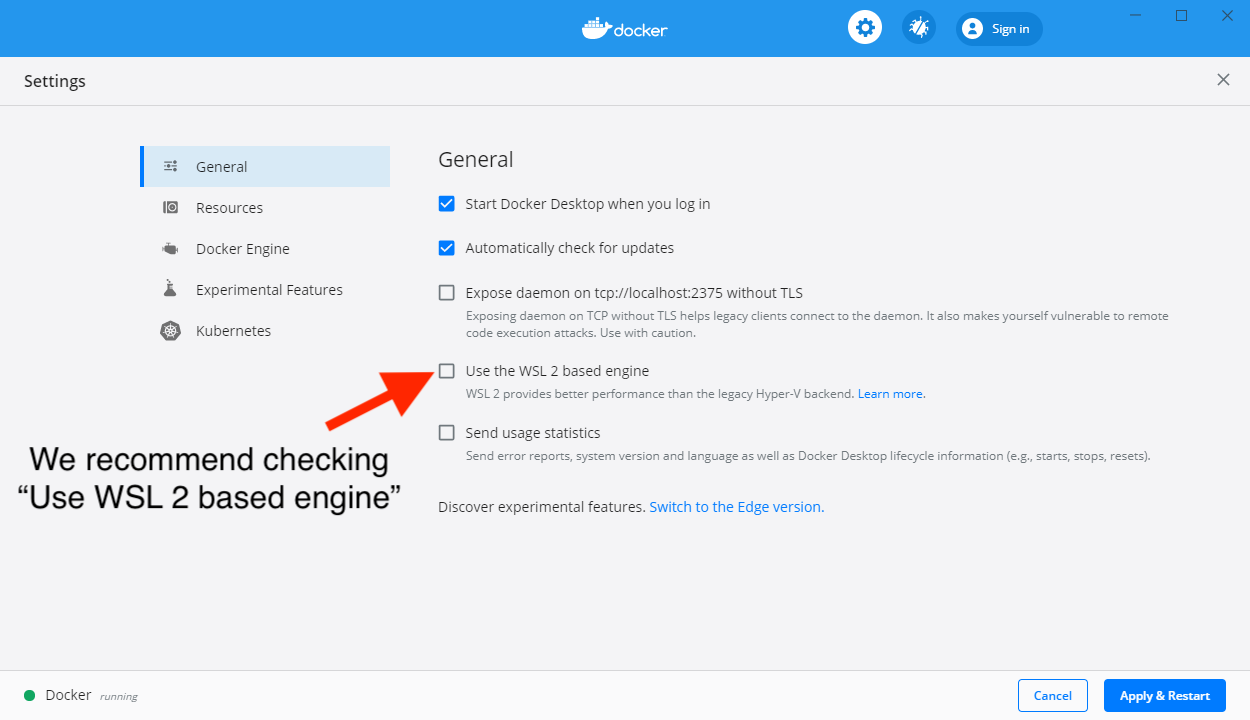
Another thing you’ll want to check is your Docker settings. You can get to the settings by clicking the gear icon in Docker Dashboad or by right clicking on the Docker icon in your system tray and clicking Settings (see picture above). Make sure you’ve elected to Start Docker Desktop when you log in. Also, take note of whether or not you are running with the WSL 2 based engine. If you are using WSL 2, then you are done. No more configuration is needed. If however, you are not using the WSL 2 based engine (e.g., you decided not to use it or you are using Mac OS), read on.
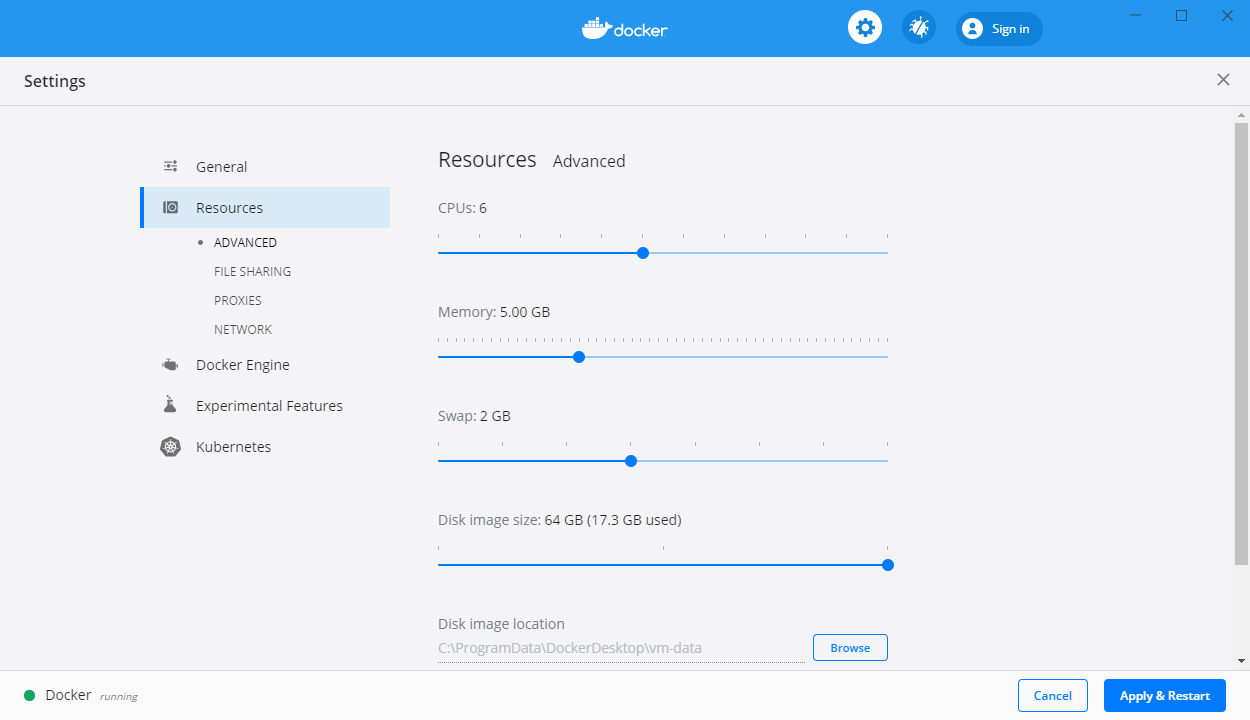
Only in the event that you are not using WSL 2, you should also increase the resources given to the Docker Virtual Machine. To do this, on the settings tab click on resources, and then make the following selections.
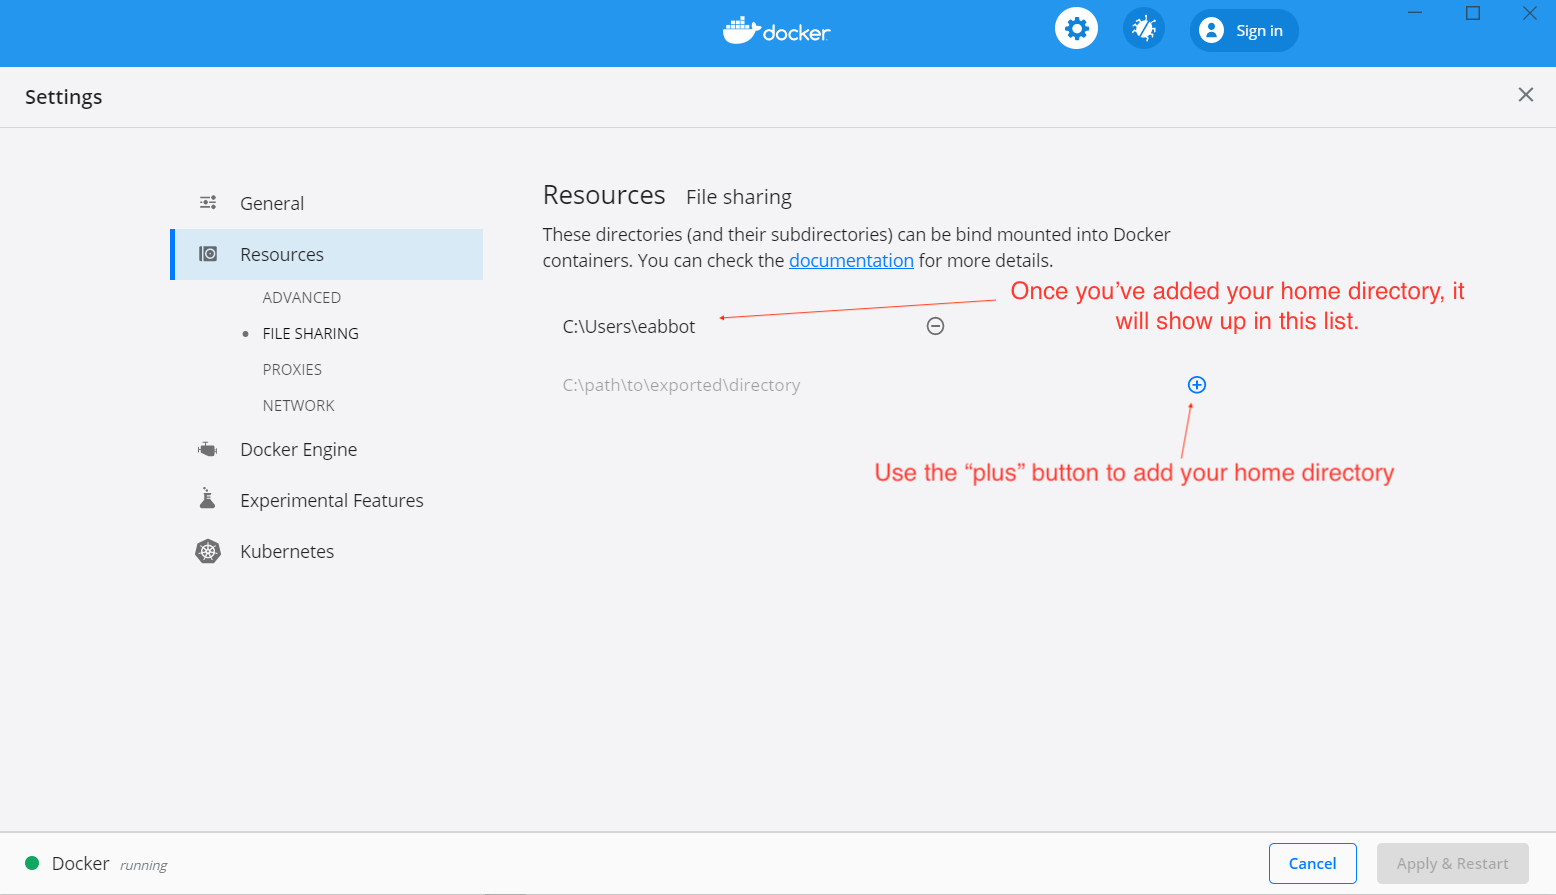
Only in the event that you are not using WSL 2, you should click on File Sharing and add your home directory to the list of shareable directories (if you don’t do this, you will get a pop-up asking you to allow sharing of your home directory when you run the simulator. When that pop-up is presented, if you click okay, then you don’t have to do this step).
Once you’ve made these selections, click Apply & Restart.
As a final check, type the following command into PowerShell (which you can open via the Windows search box).
docker run hello-world
If all went well, you should see output that starts with text like.
Hello from Docker!
This message shows that your installation appears to be working correctly.
Troubleshooting Docker
Issue: Docker Installer Got Stuck “Deploying Required Windows Features”
First, if you are having any issues with any of this (e.g., installing Docker), e-mail the QEA teaching team with a description of the problem! If you ran into the issue where the installer got stuck, it is likely because you need to manually enable the required windows features as described in this previous section.
Issue: Docker Installed, but Won’t Start
There are some reports that Windows security features are interfering with the Virtual Machine software that Docker uses. If Docker still won’t start properly (e.g., as indicated when you click on the Docker Desktop icon or when you try to run the hello-world example), try the following steps.
- Open “Window Security”
- Open “App & Browser control”
- Click “Exploit protection settings” at the bottom
- Switch to “Program settings” tab
- Locate “C:\WINDOWS\System32\vmcompute.exe” in the list and expand it
- Click “Edit”
- Scroll down to “Code flow guard (CFG)” and make sure it is set to “Override system settings” and the toggle immediately below is set to “Off”.
- Start vmcompute from an administrator PowerShell
net start vmcomputeIf this goes well, you should see something indicating that
vmcomputeis starting (or has already started). - Reboot your computer to give Docker a chance to start up again. You can then try running the hello world image to see if everything works.
If you still get an error after doing this, revisit the steps above but in step 7 use “Override system settings and put the toggle to “On” with “Use strict CFG” unchecked (we know that it is bizarre to try it both ways, but this is a weird error and there are reports of this working on the Docker forum. It also worked for one of the Spring 2020 QEA students).
Getting Docker to Play Nice with Virtual Box
There are two strategies you can use If you are already running a virtual machine on your system (e.g., for SoftDes).
Option 1: You can run the QEA simulator inside of your Linux virtual machine (that is running in VirtualBox). First, make sure you have at least 20 GB free in your VM (we have put together a guide on how to increase the VirtualBox disk size if your disk is running low on space), then follow the instructions in this document in the section Notes for Working in Linux.
Option 2: You can temporarily disable the Windows Hyper-V feature and reboot your machine. When you want to use Docker again, you will have to re-enable Hyper-V. Yes, this is super annoying. Sorry! Here are some instructions for toggling Hyper-V on and off so you can switch back and forth between Virtual Box and Docker.
Connecting to the Simulated Robot
If you’d like, here is a video walkthrough of using the simulator. We made this video for students that had used the previous version of the simulator, so some of the comparisons might not be relevant if you are using the simulator for the first time.
We will be using MATLAB as a means to connect to the your robot (both simulated and physical) and to program it to execute various behaviors.
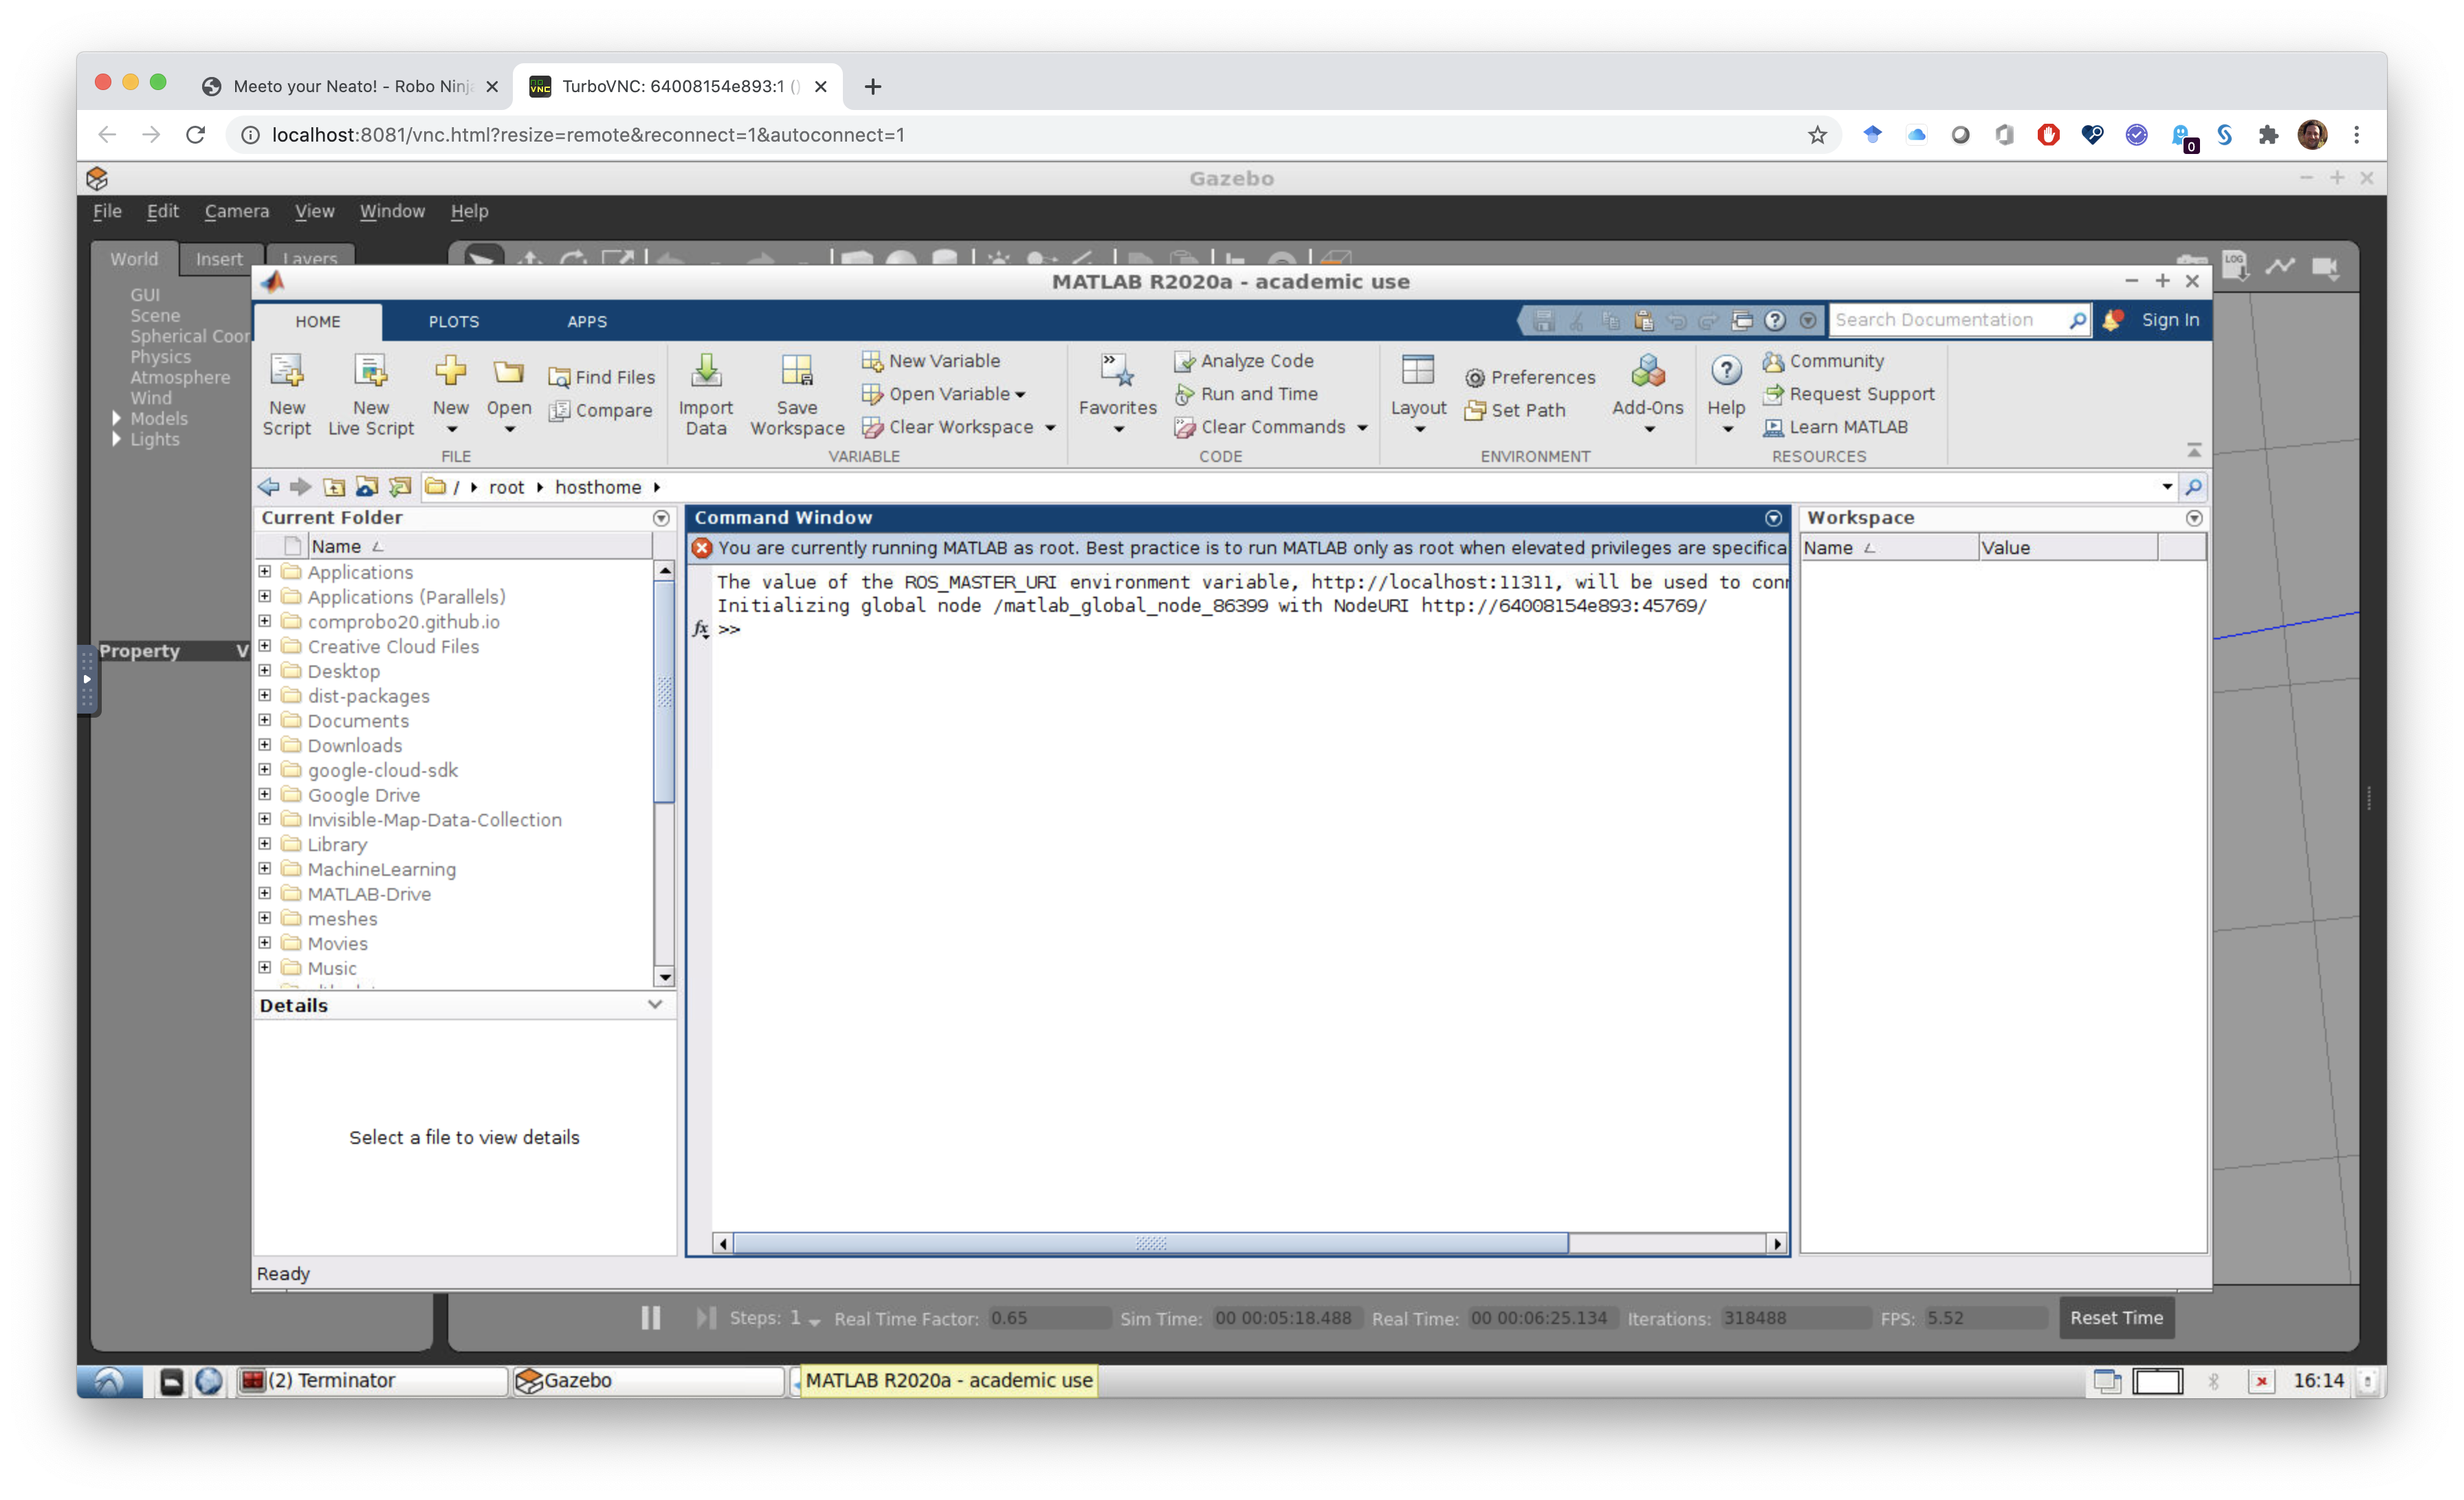
Start up MATLAB on your computer.
Note: unfortunately, the simulator does not work with MATLAB online, so you will need to do interface to the simulator from your local MATLAB install.
Use this MATLAB drive link to connect to the code for this module. Once you accept this invitation, navigate to the QEASimulatorsV2 directory. Run the following command in MATLAB.
Note: once you run the command if you see a pop-up that says Docker wants to access your home directory, please allow it to do so.
>> qeasim start gauntlet_final
If all went well, you will see output that looks like the following.
Making sure docker is running
Docker is ready
Shutting down docker container in case it is running
You will have to manually close any simulator visualizations in your browser
If you have yet to download the software, you will see a ton of output
d6297f43972cc4ddb7f4c606b7cb2d7db85fd0439907c08dee2f6342bea382c4
ROS launched.  Waiting for ROS to be ready.
ROS not yet ready
Connection looks good.  Opening visualizer
If you need to connect from a different browser, use the following link to see the simulator.
http://localhost:8081
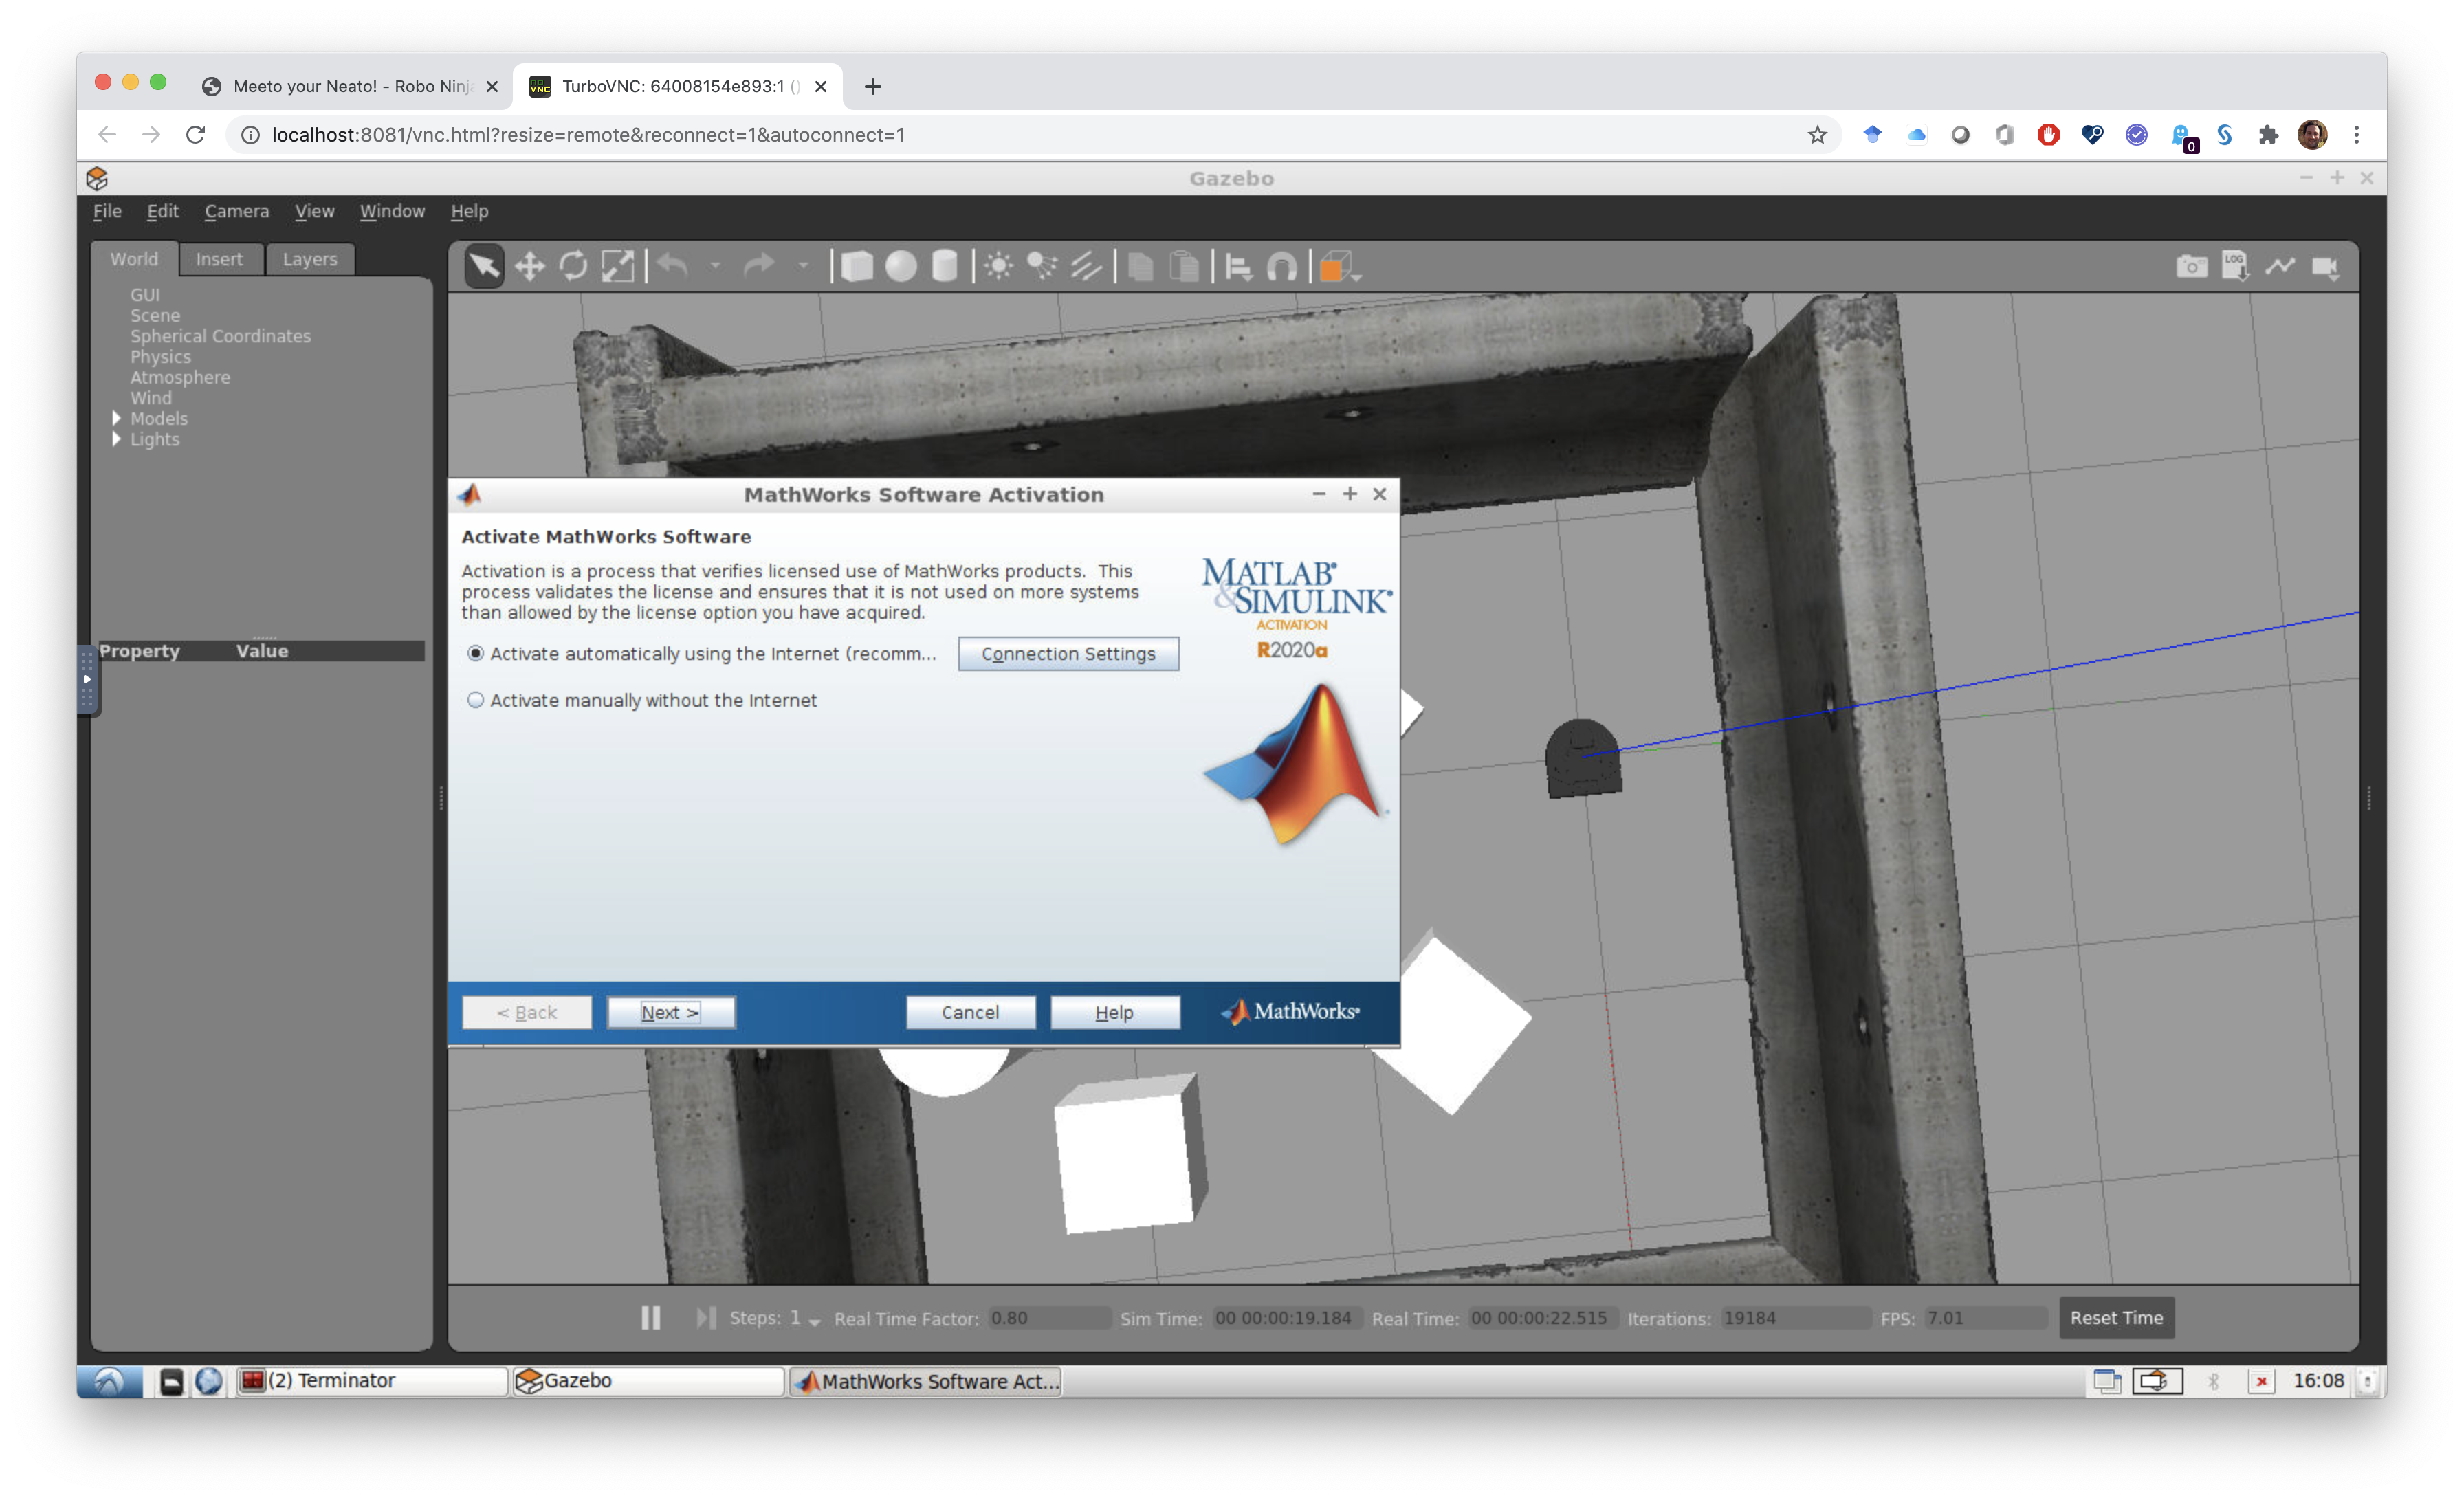
A browser window should open and display a desktop environment, a visualization of your robot, and an instance of the MathWorks Software Activation client.
It is important to note that you will be interacting with the simulator from here on out using the instance of MATLAB running in this browser window. The only time you will need to return to the MATLAB instance running in Windows (the one you used to run qeasim) is when you want to either start a new simulation environment or shutdown the simulator.
Activating MATLAB
The first time you run the simulator you will see need to activate MATLAB. This is a one-time step.
In the MathWorks Software Activation window (if it is not on top, you can bring it to the front using the toolbar at the bottom of the simulator window), perform the following steps.
- Make sure to select “Activate automatically using the Internet” and click “next”.”
- Select “Login with your MathWorks Account”, enter your email address and password, and click “next”.
- Select MATLAB (Individual) for license type and click “next”.
- Under “Login Name” type “root” and click next (this is super important!).
- Click the “Confirm” button.
- Click “Finish”
If all went well, MATLAB should launch in the simulator window and your screen will look like this.
The next time you run the simulator, you will not have to go through this process.
Testing Your Setup
If the visualiation and MATLAB appeared, the next thing you should do is make sure that you can interact with the robot. In the MATLAB instance running in the browser, run the teleopAndVisualizer script.
>> teleopAndVisualizer
You should see a MATLAB figure come up that looks like this.
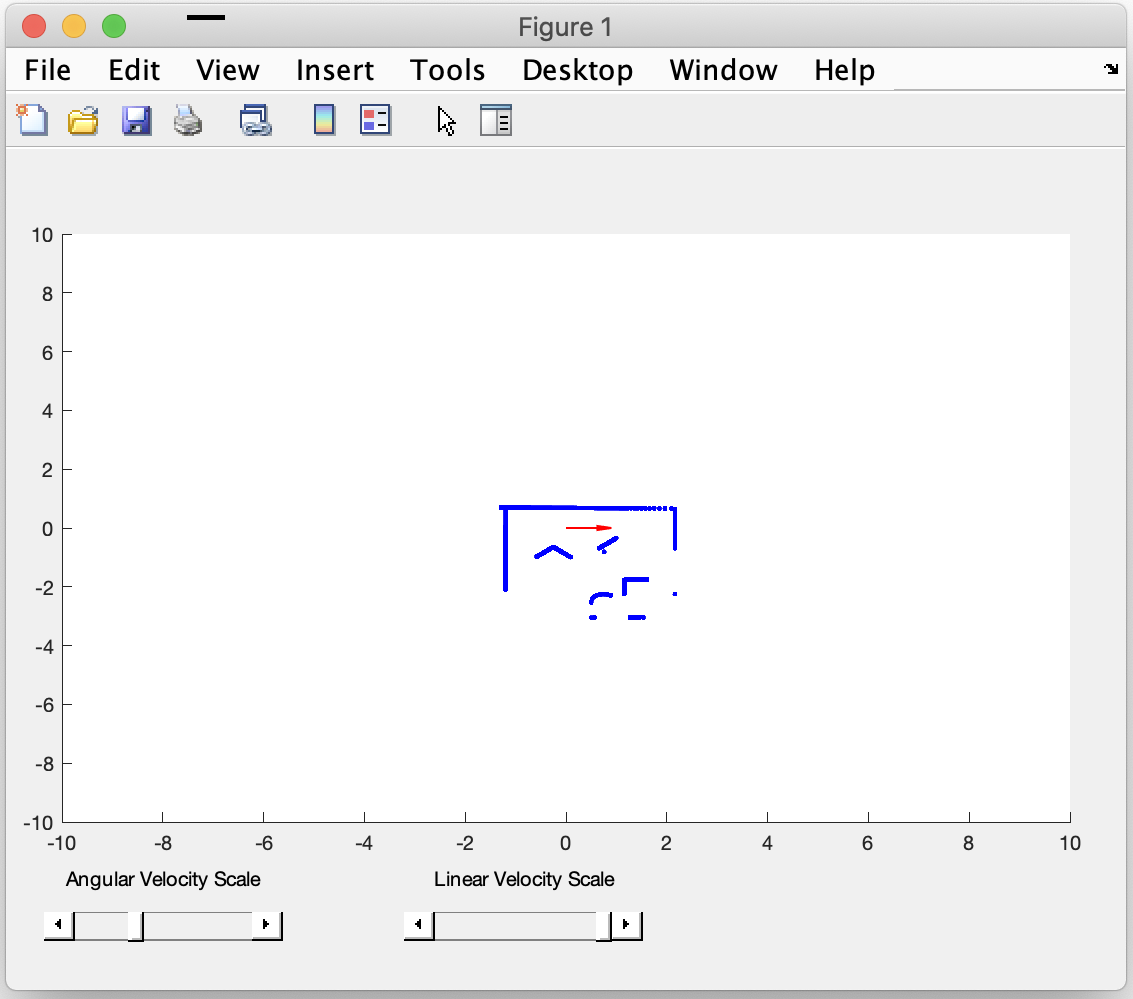
Next, click on the figure window and drive the robot around using your keyboard (i goes forward, j turns left, k stops, and l turns right). If you are able to move the robot and you see the figure window shown above, then congratulations your setup is working! Note: these key commands will not work unless you click on the figure window to bring it to the front of your stack of MATLAB windows.
If you are doing this as part of the boats module, you can go ahead and shutdown the simulator by running the following command in the MATLAB instance running on your Windows machine (the one you used to launch the simulator in the first place).
>> qeasim stop
You should see the following output.
Making sure docker is running
Docker is ready
Shutting down docker container in case it is running
You will have to manually close any simulator visualizations in your browser
ROS simulator has been succcessfully shutdown
Managing Your Files
Note that when you work with the simulator in the browser, any files you save will be deleted when you shutdown the simulator unless you put them in the /root/hosthome directory (or one of its subdirectories). By default, when MATLAB starts up in the browser, it will switch to the /root/hosthome directory. This directory will be the same as your home directory outside of the simulator. Anything you save there will be safe after you shutdown the simulator. If you are runnng MacOS, Linux, or the WSL 2 based engine for Windows, you will also see your MATLAB Drive folder. If you are using the Hyper-V Windows backend, this will not be available in the simulator (sorry, we don’t know if there is a solution to this).
Troubleshooting the Simulator
Issue: The simulator wouldn’t start when you tried to run qeasim through MATLAB. You may have seen output like the following.
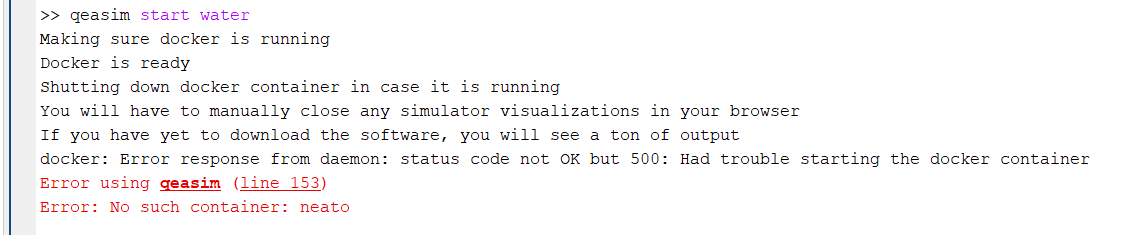
If you are having this error, you probably need to allow your home directory to be shared with the Docker container (this facilitates working with your files inside the simulator). To do this, go back to the Docker Setup section and make sure you pay attention to the instructions for setting up your File Sharing settings.
Issue: The simulator wouldn’t start when you tried to run qeasim through MATLAB. You may have seen output like the following.
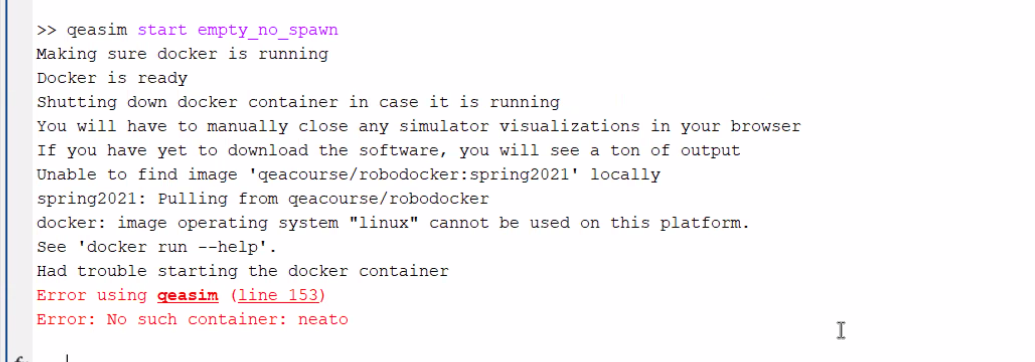
If you are having this error, you probably configured Docker to use Windows containers instead of Linux containers. Use the information at the following link to switch Docker back to Linux containers.
Programming Your Robot
Now that you are connected, you can see the list of topics by typing the following command into the command window.
>> rostopic list
Each of these topics is either a sensor channel (e.g., laser scanner, bump sensor, wheel encoder) or a motor control channel (e.g., cmd_vel, raw_vel, etc.). Go ahead and display the data flowing across the /bump topic by typing the following command in the command window.
>> rostopic echo /bump
You should see output like this.
  Data   :  [0, 0, 0, 0]
  Layout
    DataOffset :  0
    Dim        :  []
The interpretation of each of these numbers is dependent on the particular topic you are examining, however, in the case of the /bump topic the four numbers in Data correspond to the output of each of the four bump sensors on the robot. Go ahead and push the front bumper of the robot to see which bump sensor corresponds to which number.
As always, you can use Ctrl-C to terminate the execution of any Matlab script so you can keep programming.
Trying the Teleop Script
As a final test of your environment, we’re going to drive the robot around a little bit. Please visit the teleopAndVisualizer page to download that script. Assuming you are connected to the robot or the simulator, you can start that script and drive the robot around with your keyboard. Mappings between individual keys and robot motions are documented in the script itself.
Your First MATLAB Robotics Program
Let’s go ahead and create a program to drive the robot forward until it rams into something. To do this we’ll need to first learn how to control the robot’s wheels. In order to send a velocity to each of the robot’s wheels we will need to create a publisher for the /raw_vel topic.
pub = rospublisher('/raw_vel');
Once we have a publisher, we can create a message suitable for sending on that topic.
msg = rosmessage(pub);
msg.Data = [.1, .1];
send(pub, msg);
This message corresponds to telling the robot’s wheels to each move forward at a velocity of 0.1 m/s.
If your robot is not moving, return to your firewall settings and make sure ALL MATLAB inbound rules are as described above. (There could be new inbound rules now that you’ve connected to the robot.)
We can create subscribers to topics using the rossubscriber command.
sub_bump = rossubscriber('/bump');
We can put these two together to create a simple program where the robot will move forward with a constant velocity (in this case 0.1 m/s) until one of the bump sensors is triggered. You can put this code in a MATLAB script (e.g., driveUntilBump.m).
pub = rospublisher('/raw_vel');
sub_bump = rossubscriber('/bump');
msg = rosmessage(pub);

% get the robot moving
msg.Data = [0.1, 0.1];
send(pub, msg);

while 1
    % wait for the next bump message
    bumpMessage = receive(sub_bump);

    % check if any of the bump sensors are set to 1 (meaning triggered)
    if any(bumpMessage.Data)
        msg.Data = [0.0, 0.0];
        send(pub, msg);
        break;
    end
end
Disconnecting from the Simulated Robot
When you are ready to stop the simulator, run the following command in the MATLAB instance you used to start the simulator (not the MATLAB in your browser!) (making sure that qeasim.m is either your current directory or in your MATLAB path).
>> qeasim stop
If all went well, you will see output like the following.
Making sure docker is running
Docker is ready
Shutting down docker container in case it is running
You will have to manually close any simulator visualizations in your browser
ROS simulator has been succcessfully shutdown
Notes for working in Linux
Follow the Linux Docker install instructions. You want Docker CE, not Docker EE
Post installation steps
Perform the steps to manage Docker as a non root user. Then restart your computer.
Launching the Simulator
Note: if you did this last semester, you will have to rerun the following command if you’d like to connect to the physical robots.
On your Linux system, open a terminal and run the following command.
$ curl https://raw.githubusercontent.com/qeacourse/RoboNinjaWarrior/master/docker/qeaspring2021/qeasim > /tmp/qeasim; sudo cp /tmp/qeasim /usr/local/bin/qeasim; sudo chmod +x /usr/local/bin/qeasim
To launch the simulator you can open a terminal and run comands like the following.
Start the water simulation.
$ qeasim start water
Start the gauntlet world.
$ qeasim start gauntlet_final
Shutdown the simulator.
$ qeasim stop
Everything else should work as with Windows.
Notes for Working in MacOSX
Note: this will only work on Intel Macs (not on ARM-based Macs like the M1)
Download Docker Desktop for Mac
Launching the Simulator
Note: if you did this last semester, you will have to rerun the following command if you’d like to connect to the physical robots.
Open a terminal and run the following command.
$ curl https://raw.githubusercontent.com/qeacourse/RoboNinjaWarrior/master/docker/qeaspring2021/qeasim > /tmp/qeasim; sudo cp /tmp/qeasim /usr/local/bin/qeasim; sudo chmod +x /usr/local/bin/qeasim
To launch the simulator you can open a terminal and run comands like the following.
Start the water simulation.
$ qeasim start water
Start the gauntlet world.
$ qeasim start gauntlet_final
Shutdown the simulator.
$ qeasim stop
Everything else should work as with Windows.